

09 December 2009
Featured Page - Sisters
This heritage layout goes into my mom's biography scrapbook. It features her and her sister as kids. I used acetate as the base paper. I used Hero Arts stamps for the green flowers on the acetate, as well as to add flowers to the center of my K&CO flower shaped tags. I also used a Hero Arts stamp for the card that the title is on.
08 December 2009
Family Tree Diagram Papers
I recommend using Family Tree diagram papers to help keep your scrapbooks organized and to help tell your family story. Here are some you might choose from:
Deja Views Kit:

Ancestry.com Papers from K&Co:


Bazzill Basics Papers:


My Mind's Eye Papers:


Deja Views Kit:
Ancestry.com Papers from K&Co:
Bazzill Basics Papers:
My Mind's Eye Papers:
05 December 2009
Memorial Shadow Box
Here's a project I did today, a memorial shadow box. This shadow box displays a photo of my paternal grandparents, Thomas and Sarah Craft. I included two photos of them, an army medallion and a copy of their marriage certificate. I really like how it came out, as well as the fact that I can change it if I want to.
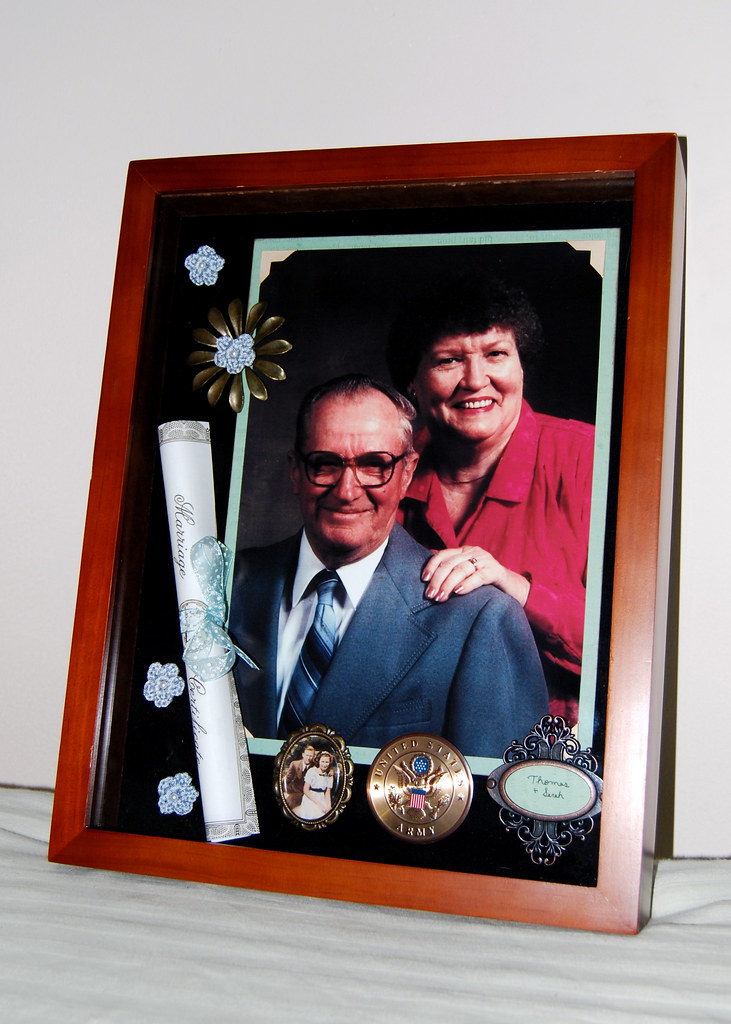
Products used:
• other assorted scrapbooking items
02 December 2009
Difficult to Remove Photos: Two Solutions
While transferring the family photos from the old magnetic albums to archival safe scrapbooks, I occasionally come across photos that are difficult to remove. In this video, I show two methods that I'm using to remove them.
15 November 2009
Changing Albums
Many of our older family photo albums are in the "magnetic" albums. These are the ones with the peel-back cover where the photos adhere to the page. Well, these are really bad for your photos. Don't believe me? See what the Photo Detective has to say.
Well, it took some doing, but I convinced my mom to change the photos out of these old albums and into archival save scrapbooks. We have seven albums to complete. Here's how we're doing it:
28 October 2009
Featured Page - Albea Kids
I made this page using the "Vintage Findings" kit I previously mentioned. Aside from the acetate page, the main pattern paper I used for a background, and the rub-on alphabets, everything on this page is from the "vintage findings" kit. Thanks to that kit, this page took about 10 minutes!
Looking at this page from a genealogy perspective, I really should label the children... I'll probably add a tag with the names of the children and "hide" it behind the photo.

Roy, June, Charlie
Ruby, Lloyd & Larry Albea
25 October 2009
Featured Page - G for Genealogy
This is a page I did a while ago for an ABC album. I chose Genealogy to stand for 'G' and used one of my favorite photos from my collection. The journaling card is attached by one brad and can swivel to reveal the rest of the photo.

24 October 2009
Shopping for Supplies
I had a rare Saturday off from work today, and spent it shopping with my mom. We hit up a lot of different stores that carried scrapbook supplies.
 First, we hit Archivers, which is a scrapbooking chain store. I saw some great new products from Making Memories: Vintage Findings kits. These kits contain great random "vintage" items such as buttons, keys, ribbon, paper, ticket stubs, etc. If you're interested in ephemera pages, these kits are for you. Check them out at MM's website.
 Later, we ended up at Hobby Lobby. I picked up some K&Company die-cut cardstock tags. What's great about these is that you can easily create an album that flows and carries a theme. I plan to use these on my census pages to add titles and captions. Also, these tags are made by the same company as those that are used in Ancestry.com's My Canvas publishing. So, if you created a digital scrapbook with My Canvas, you can create a traditional scrapbook that carries the same theme.

First, we hit Archivers, which is a scrapbooking chain store. I saw some great new products from Making Memories: Vintage Findings kits. These kits contain great random "vintage" items such as buttons, keys, ribbon, paper, ticket stubs, etc. If you're interested in ephemera pages, these kits are for you. Check them out at MM's website. I also saw great products for genealogy scrapbook pages from Tim Holtz and Jenni Bowland, such as chipboard buttons, vintage papers, distressing supplies, and more.
Next, we hit a few bookstores, looking at their Genealogy section. I was disappointed in the selection, with both Barnes and Noble and Borders having only a few books each. Oh, well - I'll have to get them online.
Later, we ended up at Hobby Lobby. I picked up some K&Company die-cut cardstock tags. What's great about these is that you can easily create an album that flows and carries a theme. I plan to use these on my census pages to add titles and captions. Also, these tags are made by the same company as those that are used in Ancestry.com's My Canvas publishing. So, if you created a digital scrapbook with My Canvas, you can create a traditional scrapbook that carries the same theme. Also at Hobby Lobby, I saw these great mini-book overs from 7 Gypsies. They really look like antique book covers and photo album covers. I didn't pick any up because I don't have a project to use them for - but I love that they are available.
23 October 2009
Featured Page - The Family Tree
This page was done on acetate for my mom's biography scrapbook. I took a piece of 8x8 acetate and painted it with Making Memories taupe colored paint. I thin stamped it was a light green paint and Hero Arts' K5165 French Country stamp. So, in a way, I made my own patter paper.

I lined my tree up how I wanted it (and how it would fit on the page), using the same green paint on the edges of the name blocks to give it a more finished look. To designate the couples, I used a small leaf punch to connect the name blocks.
Finally, I hand painted "the family tree" in the middle.
02 September 2009
Featured Page - Albea Census
This genealogy scrapbook layout showcases the 1930 census record of Charles Vernon and Auline Albea and their family. The letters are chipboard that I painted, and I used a red felt arrow to highlight the family on the census page.

27 August 2009
Using Originals
One question that is often posed when creating genealogy scrapbook pages is: should I use original photos? Just about 100% of the time, the answer back will be a resounding 'no!' However, I have used originals in my scrapbooks at times.
The main concern with using originals is that the photo will be damaged and exposed. When working with old photos, this may be the only copy available and is probably not replaceable. It only makes sense that you wouldn't want to risk the photo and it's very easy to use a copy. However - aren't scrapbooks just a fancy photo album? Aren't scrapbooks made to display photos?
As I said, I've used original photos in my scrapbooks before - in one in particular. My maternal grandfather had his old photos sitting in a box, piled on top of each other. My mom took these photos and put them into a scrapbook/photo album, simply putting them on white paper, using photo corners and writing labels on the white paper.
This had me thinking: what would be the difference if I put them on color paper, adding a title and a few embellishments? All of the products would be "archival safe," with only the paper and photo corners coming into direct contact with the photos. So, I took the photos and put them into a scrapbook.
Some key things to remember:
Some key things to remember:
- Use all "archival safe" scrapbooking products.
- Do not permanently adhear the photos to anything. Use photo corners to place the photos on the page.
- Do not adhear anything to the photos - and even avoid having any other page elements touching the photo.
- Keep your scrapbook in a clean and dry location, away from direct sunlight.
- Use cotton gloves when handling the photos.
15 August 2009
Featured Page - The Rocky Road of Love

In this layout, both the photo and the copy of the marriage certificate are removable for better viewing.
01 August 2009
Featured Page - What's In A Name?

This scrapbook layout is about my grandfather, Thomas S. Craft. When he was born, his name was registered as Herbert. He had no idea of this fact when he was young, but eventually had to file for an amended birth certificate. This layout is showcases those documents, which are very important in my genealogy research.
Because the documents are important, they are all fully removable from the page. To explain the document, I've also included the story in a hidden journaling block. It's on the beige paper behind the photo.
28 July 2009
Featured Page - Father

This is another page for my mom's biography book. This page is about her father, Roy Albea. It's very simple, with the title coming from the pattern paper. It's a simple layout, using layered papers and no embellishments. I even created the pattern paper that's directly under the photo. I used a Hero Arts stamp, along with their 'soft pool' ink, to create paper to go with the layout.
25 July 2009
Featured Page - School Days

I designed this layout to showcase my mom's report cards. I created copies of her cards and have arranged them in a way that they can be lifted to reveal each card in its entirety. I once again made use of inking, with my favorite chestnut color. I also created the apple, which I used to draw attention to the chipboard letters of the title.
24 July 2009
Design Principles
For those just getting started, check out these quick tips for designing your page. ExpertVillage has a lot of great videos for beginner scrapbookers. Check out their videos here.
23 July 2009
Featured Page - 3 Albea Generations

The small caption at the bottom reads, "one couple, six children, lots of grandchildren." I used chipboard, paint, button and ribbon on this layout. The letters were cut with a Cricut machine.
22 July 2009
Where to Start?
One major question when getting started with scrapbooking your genealogy is: Where to start? There are so many different branches to each family tree and so many different ways to organize your scrapbook. The key is to have a plan in mind before you get started. Here are just a few ideas on how to organize a heritage scrapbook:
 Regardless of which strategies you use, organization is key when scraping your family tree. Scrapbooking is just another way of preserving and presenting your family tree, and if it isn't organized properly, it won't do your descendants much good.
- Create a book about your/any immediate family. Only include yourself, your parents, siblings and possibly grandparents (think Family Group Sheet). This would be a great way to get your feet wet.
- Follow one branch per book, organized as either a pedigree or descendent book. With this book you would focus on one couple at a time, following a direct line, and not have to worry about collateral lines.
- Create a descendent book, like a Family History publication. You can include a section on the couple and then create pages for all children. From there, follow your family line, continuing in a pattern.
You might find it helpful to look over what photos, documents and memoribilia you have. You could make brainstorm a rough list of pages that you would like to make before you even get started. This way, you can see which organizational method you prefer, and place the pages in a way that make sense for you.
There's really nothing to hold you back and no wrong way to do things. In some scrapbooks, I've followed a random path up my tree, in others I've followed direct lines. Here are a few things that will help keep your book organized no matter what you decide to do:
- Tree Charts. Any time you feel that the branches are getting hard to follow, put a family tree chart into your book. I'd recommend putting a tree chart into almost every scrapbook, regardless.
- Title Pages. Whenever you change to a different surname, create a title page to mark the change. These pages work much like dividers.
- Use Journaling / List facts. When starting a page on a new person, include a biography that states who this individual's parents were.
Featured Page - Thomas in the Army

21 July 2009
Featured Page - When My Daddy...

In this page, I've used a lot of different products, in a lot of different styles and colors. I helped fit them together by giving the papers and shapes a "distressed" look. I used ColorBox's Chestnut Fluid Chalk ink-pad, inking the edges of the papers and shapes. This ink-pad is one of my must-haves, especially when creating genealogy / heritage pages.
Getting Started with Heritage Scrapbooking
For genealogists who want to start "Heritage Scrapbooking," there are many helpful products available.
 Ancestry.com has partnered with K&Company to produce a line of products. These items are available in a number of places online (Ancestry, K&Co, Scrapbook.com, etc), as well as in stores such as Target, JoAnn, and Archivers. For beginners, try this kit, which has just about everything you need to get started.
 Other brands, such as Karen Foster, Deja Views, Making Memories, Tim Holtz, etc., produce products specifically for scrapbooking your genealogy. Items include papers, stickers, alphabets, brads, embellishments and more. Try browsing Scrapbook.com's online store for terms such as "family history" and "heritage" to see what else is available.
Before you start shopping, browse around and see what sort of style you like. The genealogy products are often in a neutral and "old fashioned" colors and themes. If this doesn't fit your style, there's still a world of products available outside of the genealogy section. Planning ahead on what sort of pages you want to create will save you from buying a lot of products that you end up never using. Perhaps, go ahead and pick out a few photos that you'd like to start with and buy items specifically for those photos.
20 July 2009
Getting Started
I've been scrapbooking since High School. As a senior, there was a year long "Senior Scrapbook" project in english class. There were a few essay assignments, but it was really just a fun way for the senior class to collect and preserve memories. My mom helped me and we both became hooked on scrapbooking.
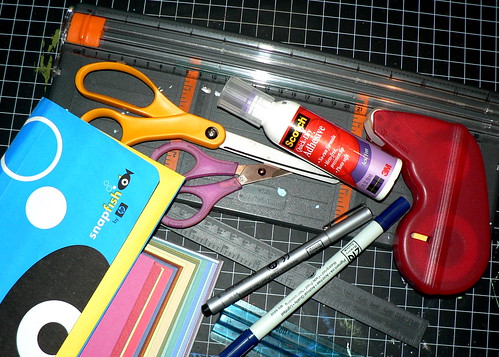

It seemed very intimidating at first, but there's really not much to it. Most folks already have photos, and after that there are only a few basic supplies:
- Paper
- Scissors
- Paper trimmer
- Adhesives
- Pens
- Ruler
- Cutting mat
- Album (not shown)
All of this should come in around $50. Other items that come in handy include:
- Stamps
- Ink & Paint
- Stapler
- Eyelets and Brads
- Water colors
- Stickers
- Rub-ons
- Buttons
- Ribbon
- Flowers
- Punches
Before you get started, I'd recommend looking at what other scrapbookers are doing. It might seem a bit intimidating if you've never considered yourself artistic, but everyone is new to this at some point. I recommend the community at Scrapbook.com and magazines such as Simple Scrapbooks. Resources such as these will help give you an idea as to what's possible.
Also, to protect your photos and ensure a long lasting scrapbook, look for products that are "archival safe" or "acid free."
Welcome to GeneaScraps
Welcome to GeneaScraps! Although I already run another genealogy blog, I decided to create another one. This blog will showcase my genealogy related scrapbooking.
I generally to "traditional scrapbooking," meaning that I use paper, scissors, paint, stamps, embellishments, etc. to create scrapbook pages. I do occasionally create pages digitally, but it's a rare event.
Here's a page I did today:

I made this page on acetate (clear plastic), which the entire book will be made of. It's a challenging material to work with, as you can see straight through to the next page. I used a Hero Arts stamp, Paisley Swirl, and Making Memories paint to create the background.
Subscribe to:
Posts (Atom)